

The form says the photo must be no larger than 100 KB, and the picture on your phone is 3 MB. This guide explains what actually makes a photo file big, what each control does to it, and how to reach a limit with the least damage to the picture. Every claim about numbers comes from a measurement we ran or a source we read, and we say which.
What "KB" means on a form
The metric prefix kilo means 1,000, so a kilobyte (kB) is 1,000 bytes. Computing also uses 1,024-byte units, which the International Electrotechnical Commission named the kibibyte (KiB) in 1998; NIST lists both and notes that the binary prefixes are not part of the SI. In everyday use the label "KB" gets applied to either. A form rarely says which it means.
The safe habit is to aim for fewer than 1,000 bytes per KB of the limit. The ZYSNOR tool does this: it multiplies your limit by 1,000, so a 100 KB limit means the file must be at most 100,000 bytes. That is also below 102,400 bytes, so it passes under either meaning.
Example 1. A file of 101,000 bytes is 101.0 kB, which breaks a strict 100 kB limit. A program that counts 1,024 bytes per KB would show it as 101,000 ÷ 1,024 = 98.6 KB and make it look fine. The form's own checker decides, so leave a margin.
Two numbers decide the size
A photo is a grid of pixels. Each pixel needs some number of bits once the picture is compressed, and bits per pixel (bpp) is the number that links the picture to the file:
bytes ≈ width × height × bpp ÷ 8
Take our coffee photo, 600 × 400 pixels, which is 240,000 pixels. Stored as raw 24-bit colour it needs 240,000 × 3 = 720,000 bytes. The lossless PNG version of the same photo is 461,327 bytes. A JPEG saved at high quality (Pillow quality 95) is 104,711 bytes, about 3.5 bits per pixel. The ZYSNOR tool at a 30 KB limit gave 29,585 bytes, and 29,585 × 8 ÷ 240,000 = 0.99 bits per pixel. So the formula works in both directions: the limit fixes the bits you can spend, and the bits spread over the pixels you keep.
How JPEG makes a photo smaller
JPEG stands for Joint Photographic Experts Group. The group was formed in 1986 to write a standard for continuous-tone still images, grey or colour. Gregory Wallace of Digital Equipment Corporation described the result in the April 1991 issue of Communications of the ACM, and ITU-T Recommendation T.81 was approved on 18 September 1992; ISO publishes the identical text as ISO/IEC 10918-1.
The common mode, called baseline, works in four steps:
- Blocks. The picture is cut into 8 × 8 squares of pixels.
- Transform. Each block goes through a discrete cosine transform (DCT), which re-describes the 64 pixels as 64 waves of different fineness. Nothing is lost here; the same picture is written differently.
- Quantization. Each of the 64 wave strengths is divided by a step size from a table and rounded to a whole number. Wallace calls this the principal source of loss. Fine waves are the ones that get rounded to zero first, which is why detail like skin texture and fabric goes before the big shapes.
- Entropy coding. The rounded numbers, now full of repeated zeros, are packed into a short bit string without further loss.
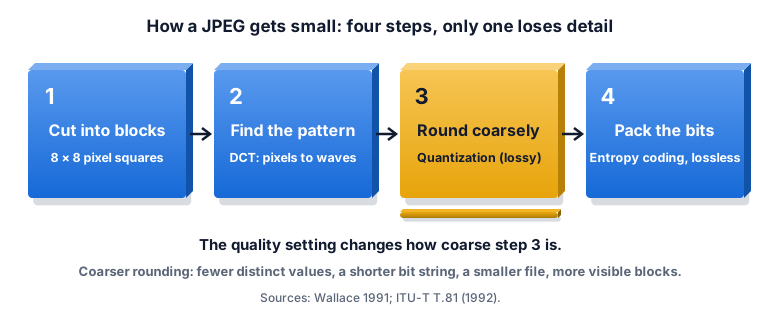
This explains the controls. A quality setting is a dial on step 3: low quality means big step sizes, many zeros, a short bit string and a small file. Pixel count is a dial on step 1: fewer blocks, fewer bits. Everything else is packaging.
One detail matters for every tool: the standard does not define a quality scale. T.81 states that no default quantization tables are specified and that applications may set values to customise picture quality. The browser documentation says the same thing from the other side: the canvas quality value is a number from 0 to 1, but how that number maps to size or looks is left to the browser. So "quality 80" in one program is not "quality 80" in another, and two tools can give different sizes for the same setting.
What the quality number does
We encoded the same 600 × 400 coffee photo in Chromium 153 at eleven quality values, and again after shrinking it to 300 × 200 and 150 × 100 pixels.
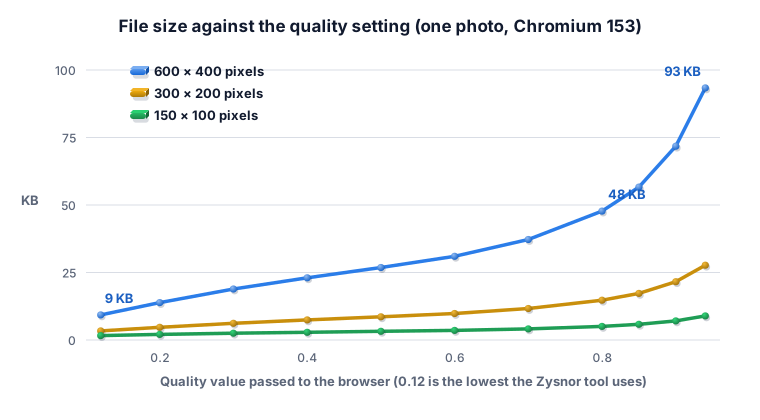
| Quality value | 600 × 400 | 300 × 200 | 150 × 100 |
|---|---|---|---|
| 0.94 | 93,353 B | 27,716 B | 8,934 B |
| 0.80 | 47,757 B | 14,729 B | 5,043 B |
| 0.50 | 26,836 B | 8,578 B | 3,214 B |
| 0.12 | 9,282 B | 3,370 B | 1,648 B |
Read it as a rule of thumb for this one photo. The top of the range is expensive: moving from 0.94 to 0.80 saved about half the bytes (93,353 down to 47,757) for a drop most people would not notice on a small screen. Below 0.5 the savings shrink while the picture gets blocky. That is why a tool that wants the best picture under a limit should use the highest quality that still fits, not the lowest.
What the pixel count does
Halving the width and the height leaves a quarter of the pixels, so you might expect a quarter of the bytes. It is not quite so. At quality 0.8 the 600 × 400 file is 47,757 bytes and the 300 × 200 file is 14,729, a ratio of 0.31, not 0.25. At 150 × 100, with one sixteenth of the pixels, the file is 5,043 bytes, a ratio of 0.11, not 0.06. The reason is that a small version of a photo packs the same objects into fewer pixels, so each pixel carries more change and needs more bits. Shrinking is effective, but you get less than the pixel arithmetic suggests.
Worked examples
Example 2: how many pixels fit in 50 KB? A 50 KB limit is 50,000 bytes, which is 400,000 bits. At 1.0 bit per pixel that pays for 400,000 pixels. For a 4:3 photo, width = √(400,000 × 4 ÷ 3) = 730 and height = 400,000 ÷ 730 ≈ 548. So about 730 × 548 pixels at about 1 bit per pixel. If you accept 0.66 bits per pixel (the level we measured at a 20 KB limit), 400,000 bits pay for 606,061 pixels, which is about 899 × 674.
The same arithmetic for the common limits, at 1.0 bit per pixel and a 4:3 shape:
| Limit | Bytes | Pixels at 1.0 bpp | Size at 4:3 |
|---|---|---|---|
| 20 KB | 20,000 | 160,000 | 462 × 346 |
| 50 KB | 50,000 | 400,000 | 730 × 548 |
| 100 KB | 100,000 | 800,000 | 1,033 × 775 |
| 200 KB | 200,000 | 1,600,000 | 1,461 × 1,095 |
This is a planning table, not a rule: 1 bit per pixel gave a similarity score around 0.89 to 0.94 on our test photos (section 7), which looks good on a screen but is not lossless. Busier photos need more bits per pixel for the same look; smooth photos need fewer.
Example 3: a phone photo to 100 KB. A 12-megapixel phone photo is 4,000 × 3,000 pixels. A 100 KB limit is 800,000 bits, so the budget is 800,000 ÷ 12,000,000 = 0.067 bits per pixel. That is far below anything that looks acceptable, so the pixel count must fall. At 1.0 bit per pixel the photo should shrink to about 800,000 pixels, about 1,033 × 775, which is a little over a quarter of each side.
Here is what the ZYSNOR tool does with it. It starts at the full size, finds that even its lowest quality (0.12) is too big and reduces each side by 20% at a time: 3,200 × 2,400, then 2,560 × 1,920, 2,048 × 1,536, 1,638 × 1,228. Our test photo needed about 0.31 bits per pixel at quality 0.12, so we expect 100,000 bytes to pay for roughly 2.6 million pixels and the first size to fit to be 1,638 × 1,228, which is about 0.4 bits per pixel. That is below the tool's 0.6 floor, so it takes one more step to about 1,310 × 982, where the limit pays for about 0.62 bits per pixel. This is our estimate from the algorithm and one test photo; we did not run a real 12-megapixel photo. If you want a different balance, resize first with the Image Resizer and then compress.
What happens at each limit
We ran the live tool on the coffee photo at five limits. From 100 KB down to 20 KB it kept all 600 × 400 pixels and only lowered the quality. At 10 KB it also shrank the picture to 384 × 256, because quality alone would have left only 0.33 bits per pixel.
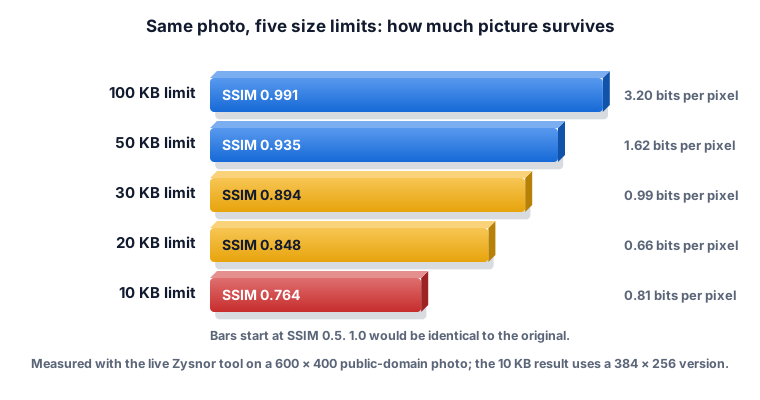
| Limit | Output | Pixels | Bits per pixel | SSIM | PSNR |
|---|---|---|---|---|---|
| 100 KB | 95,992 B | 600 × 400 | 3.20 | 0.991 | 43.6 dB |
| 50 KB | 48,596 B | 600 × 400 | 1.62 | 0.935 | 34.4 dB |
| 30 KB | 29,585 B | 600 × 400 | 0.99 | 0.894 | 31.7 dB |
| 20 KB | 19,710 B | 600 × 400 | 0.66 | 0.848 | 29.8 dB |
| 10 KB | 9,974 B | 384 × 256 | 0.81 | 0.764 | 27.3 dB |
SSIM (structural similarity) scores 1.0 for an identical picture and falls as the structure of the picture changes; PSNR is an older measure in decibels. For the 10 KB row we enlarged the smaller picture back to 600 × 400 before comparing it with the original. Google's WebP study explains why SSIM is generally preferred. Neither is the same as a person looking at the picture, so treat the numbers as a ladder rather than a verdict.
The ladder is not even. Going from 100 KB to 50 KB cost 0.056 of SSIM, and going from 20 KB to 10 KB cost 0.084 for half as many bytes saved. Wallace's 1992 article gives a rough guide for ordinary colour photographs of that era: about 0.5 to 0.75 bits per pixel for good to very good quality, with excellent above that. Our 20 KB result (0.66 bits per pixel) sits inside that band. At 10 KB the tool reaches 0.81 bits per pixel only by using fewer pixels.
The other two photos behaved the same way: they kept their size down to 20 KB and were shrunk only at 10 KB (the cat photo to 360 × 240, the astronaut to 327 × 327). When a photo already fits, the tool just re-saves it at its top quality (0.94): the cat photo, 50,163 bytes originally, came out at 46,668 bytes at both the 100 and 50 KB limits. A bigger number in the limit box therefore never inflates the file.
Why the tool shrinks the picture at very small limits
To see whether shrinking first helps at very small limits, we ran a 10 KB test with one encoder (Pillow), resizing the coffee photo to six sizes and then finding the best quality that stays under 10,000 bytes. Each result was enlarged back to 600 × 400 for comparison with the original.
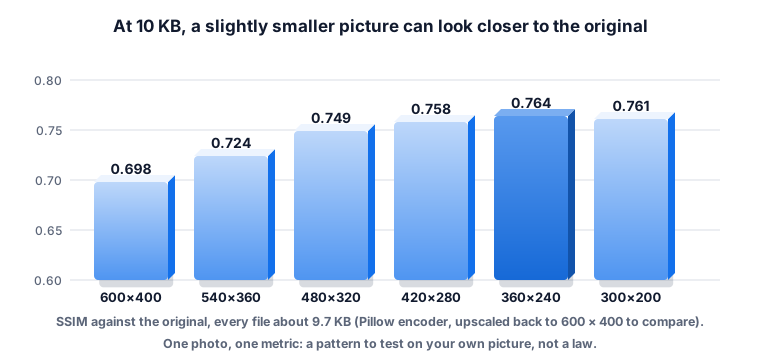
With that encoder, keeping all 600 × 400 pixels scored 0.698, and the best result was 360 × 240 at 0.764. Shrinking further to 300 × 200 did not help (0.761). The best sizes sat at about 0.7 to 1.3 bits per pixel.
So the tool keeps shrinking by 20% while the result is under 0.6 bits per pixel. At a 10 KB limit it gave 0.764 for the coffee photo (384 × 256), 0.901 for the cat photo (360 × 240) and 0.851 for the astronaut (327 × 327), scored against the originals. At 20 KB and above every pixel is kept, because those photos are already above 0.6 bits per pixel. The 0.6 rule comes from one photo and a small test; for a face or a document photo, look at the result and decide.
JPG, WebP or PNG?
PNG stores every pixel without loss and is the wrong tool for a photo size limit: our coffee photo is 461,327 bytes as a PNG and 104,711 as a high-quality JPEG. Use PNG only for logos, screenshots and pictures that need transparency; JPG has no transparency, so the ZYSNOR tool fills transparent areas with white.
WebP is Google's newer format. Google's study reports lossy WebP files 25% to 34% smaller than JPEG at the same SSIM, using the libjpeg encoder as the JPEG baseline. In our test the same pattern appeared at two limits with the tool's own encoders: at 30 KB, WebP scored 0.928 against 0.894 for JPG, and at 20 KB, 0.885 against 0.848. At 10 KB both formats ended at 384 × 256 and WebP scored 0.812 against 0.764 for JPG. The gain depends on the encoder and the picture, and a form that asks for a JPG will reject a WebP, so choose WebP only where the form says it is accepted.
Common mistakes
- Renaming a file. Changing photo.png to photo.jpg changes the label, not the data. The size stays the same and some forms detect the mismatch.
- Using a screenshot. A screenshot is usually a PNG of every screen pixel. Take or convert to a real JPG instead.
- Ignoring the margin. A file of 100.4 kB passes a 100 KB checker on a computer that shows 98 KB and fails the strict one. Aim under in bytes.
- Cropping last. Cutting empty background before compressing removes pixels outright. Cropping away half the area saves about half the bytes at the same bits per pixel, with no loss to the part you keep.
- Fearing a second save. In our test, saving a photo ten times at the same quality barely changed it: the similarity score went from 0.908 after the first save to 0.907 after the tenth, and the size stayed 41.5 KB. But alternating two different qualities (85, then 70) dropped the score from 0.931 to 0.873 on the second save and then stayed near 0.869. Start from the original file when you can, and change the setting once.
- Asking for an exact size. The tool finds the highest quality under your limit in nine halving steps, so the result is just under it (95,992 bytes for a 100 KB limit), not exactly equal. Making a file bigger on purpose is not something it does.
Practice problems
Problem 1. A 1,600 × 1,200 photo must be at most 150 kB. How many bits per pixel does that allow?
Answer: 150,000 × 8 = 1,200,000 bits; 1,600 × 1,200 = 1,920,000 pixels; 1,200,000 ÷ 1,920,000 = 0.625 bits per pixel. That is inside Wallace's 0.5 to 0.75 band, so quality alone should be enough.
Problem 2. The form says 250 KB. What is the safe target in bytes, and what is it in KiB?
Answer: 250,000 bytes, which is 250,000 ÷ 1,024 = 244.1 KiB. A file under 244 KiB passes under either meaning.
Problem 3. About how big is an 800 × 600 photo at 1.2 bits per pixel?
Answer: 800 × 600 = 480,000 pixels; 480,000 × 1.2 ÷ 8 = 72,000 bytes.
Problem 4. A 3,000 × 2,000 photo must be at most 100 kB. What size would give about 1 bit per pixel?
Answer: 100,000 × 8 = 800,000 bits, so 800,000 pixels. The scale factor is √(800,000 ÷ 6,000,000) = 0.365, giving about 1,095 × 730. At the full size the budget is only 0.13 bits per pixel, which is too low.
Limits of this guide
- We tested three small photos in one browser (Chromium 153). Firefox and Safari use their own encoders, so sizes for the same setting will differ.
- SSIM and PSNR compare numbers, not eyes. Faces, text and sharp edges can look worse than the score suggests.
- The phone-photo example in section 6 is an estimate from the tool's algorithm, not a run on a 12-megapixel image.
- We do not list any country's or agency's photo limits. The official pages that publish them could not be read for this review, and they change; use the limit shown on your own form.
- The 0.6 bits per pixel rule is our own choice, set from one photo and checked on two more at 10 KB. It is not a standard.
- The size ladder depends on the picture. A smooth sky compresses far better than a crowd.
Glossary
- Pixel: one dot of the picture.
- Bit and byte: a byte is 8 bits.
- kB and KiB: 1,000 bytes and 1,024 bytes.
- Bits per pixel (bpp): compressed file bits divided by pixels.
- Lossy and lossless: lossy compression throws detail away for good; lossless can restore the original exactly.
- DCT: the discrete cosine transform, which rewrites a block of pixels as waves.
- Quantization: the rounding step that is the main source of loss in JPEG.
- SSIM: a similarity score from 0 to 1 between a picture and its original.