

Receipts for an expense claim, photos of a handwritten assignment, ID pages for an application: many forms want one PDF, not a pile of photos. This guide shows how to get the order, page size and orientation right, how many pixels a photo needs to print sharply, and what happens to the file size.
What the conversion does
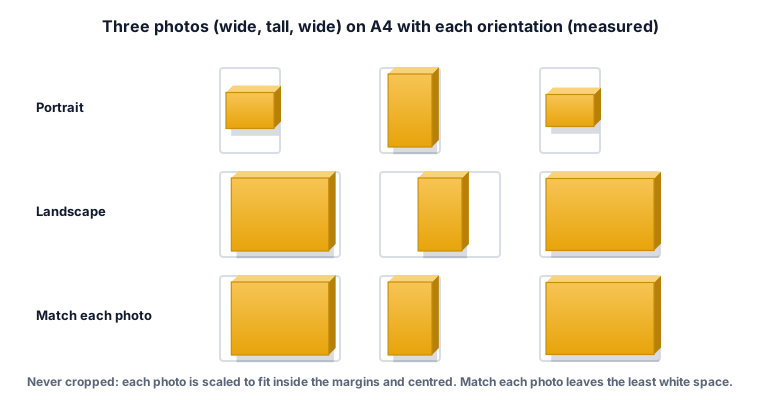
Each photo becomes one page. The photo is scaled to fit inside the page and the margins, keeping its shape, and centred. Nothing is cropped, so a photo with a different shape from the page leaves white bands at the sides or at the top and bottom.
Order first
The order on screen is the page order. Put the photos in order with the arrow buttons before you create the PDF; if you change the order or a setting while it is being made, the tool stops and asks you to create it again. Name your photos 01, 02, 03 before choosing them and they usually arrive in the right order.
Page size and orientation
A4 (595 × 842 points) is the standard in most countries; US Letter (612 × 792) in the United States and Canada. A3 is twice A4, A5 half. Portrait puts every photo on an upright page, landscape on a wide page. Match each photo turns the page to suit each photo: in our test a wide photo got a landscape A4 page, a tall one a portrait page, and the next wide one landscape again. That gives the largest picture with the least white space.
Margins
None puts the photo right to the page edge; Small leaves 24 points (about 8 mm); Large 48 points (about 17 mm). Many home printers cannot print to the edge, so None can lose a thin strip when printed. Margins did not change the file size in our tests.
How many pixels a page needs
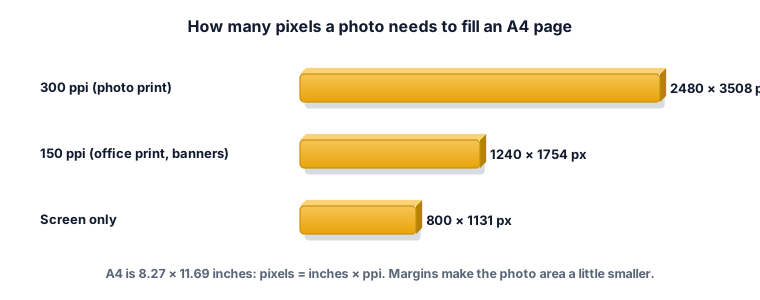
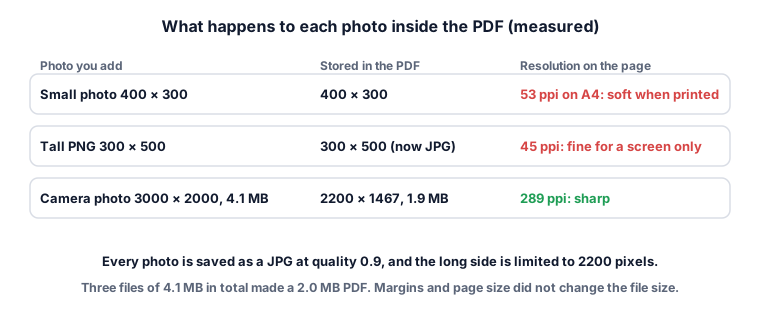
Print shops usually ask for at least 300 ppi for print, and 150 ppi for large banners. For a full A4 page that is 2480 × 3508 pixels at 300 ppi, or 1240 × 1754 at 150 ppi. A modern phone photo (about 4000 × 3000) is more than enough. A small image from a chat app may not be: our 400 × 300 photo filled an A4 page at only 53 pixels per inch, which looks soft on paper.
What happens to file size
The tool saves every photo as a JPG at quality 0.9 and limits its long side to 2200 pixels. That is enough for about 289 pixels per inch on a portrait A4 page with small margins. Our three photos of 4.1 MB in total made a 2.0 MB PDF, because the 3000 × 2000 camera photo was reduced to 2200 × 1467. A PNG is also turned into a JPG, so a PNG screenshot may come out slightly less crisp.
Worked example 1: receipts for an expense claim
Eight phone photos of receipts, some wide and some tall. Choose A4, Match each photo and Small margins. Each receipt fills as much of its page as possible. At 2200 pixels on the long side each one prints at well over 150 ppi.
Worked example 2: a handwritten assignment
Six tall photos of notebook pages. Choose A4, Portrait, Small margins. Check that page 1 is the first page of the assignment before you create the PDF. If the teacher prints it, the photos are sharp enough; if the file is too large to upload, see the PDF size guide.
Worked example 3: will it print sharply?
A photo is 1600 × 1200 pixels and goes on a landscape A4 page with no margins (11.69 inches wide). 1600 ÷ 11.69 ≈ 137 pixels per inch: fine on screen, a little soft on paper. On an A5 page (8.27 inches wide in landscape) it would be 1600 ÷ 8.27 ≈ 193 pixels per inch.
Worked example 4: more than 30 photos
The tool takes up to 30 photos at a time. For 45 photos, make one PDF of 30 and one of 15, then join them with Merge PDF.
Worked example 5: US Letter for an American form
Choose US Letter instead of A4. Letter is a little wider and shorter, so a tall photo has slightly more white space at the sides. In our test the pages came out at exactly 612 × 792 points.
What the ZYSNOR JPG to PDF tool does
The tool runs in your browser, so your photos are not uploaded.
- Input: 1 to 30 JPG, PNG or WebP photos, one per page.
- Page size: A4, A3, A5 or US Letter. Orientation: portrait, landscape or match each photo. Margins: none, small or large.
- Storage: every photo saved as a JPG at quality 0.9, long side at most 2200 pixels.
- Output: one PDF; you can type a file name.
Mistakes that waste time
- Wrong order. Check page 1 and the last page before creating.
- Tiny images. Chat-app copies are often small. Use the original photo.
- Sideways photos. Rotate them first, or rotate the PDF pages afterwards.
- No margins for a home printer. Use Small.
Words you may meet
- ppi: pixels per inch of paper.
- Portrait / landscape: taller than wide / wider than tall.
- Point: 1/72 inch, the unit of PDF page sizes.
Practice problems
Problem 1. How many pixels wide must a photo be to fill a portrait A4 page at 300 ppi with no margins?
Show the worked answer
8.27 × 300 ≈ 2480 pixels.
Problem 2. A 1000 × 1500 photo on a portrait A5 page (5.83 × 8.27 inches), no margins. About how many ppi?
Show the worked answer
Width: 1000 ÷ 5.83 ≈ 172. Height: 1500 ÷ 8.27 ≈ 181. The photo is limited by the width, so about 172 ppi.
Problem 3. You add a 4000 × 3000 photo. How big is it inside the PDF?
Show the worked answer
The long side is limited to 2200: scale 2200 ÷ 4000 = 0.55, so 2200 × 1650 pixels.
Ready to try it on your own photos? The free JPG to PDF tool does the work in your browser, and the button in the page header takes you straight to it.